You can save quite a lot of money by loading 35mm film from bulk, and you can load whatever lengths you want: there is more about potential savings below. You can also experiment with odd rolls of bulk film that you buy cheap or indeed are given. There is a separate small module about 35mm film cassettes.
bulk film lengths
The standard length nowadays for bulk film is 30 metres which is 98.5 feet, though you may occasionally find 100-foot rolls.
Either will give you 18 rolls of 36 exposures with a bit left over: a bit under a foot/30cm with 30 metres, or about two and a half feet (call it 75cm) from 100 feet. Both surpluses are best regarded as a safety margin: cutting a film an inch long is better than cutting it an inch short.
Sometimes you may find 17 metre bulk rolls which give you 10 rolls of 36 exposures with about 50cm/18 inches of film left over. A 50 foot roll (very rare today) is 15.24 metres.
film lengths for different numbers of exposures
A certain amount depends on the camera but you will not go far wrong with the following formula:
For a single exposure, after allowing for the leader (the bit that sticks out of the cassette and is wound on) and the trailer (the bit that remains attached to the film spool), you need 30cm or 12 inches. For each additional exposure, allow 8 perforations = 38mm or 1.5 inches
This gives the following figures for full-frame 35mm (24x36mm nominal), rounded upwards to the nearest centimetre or half inch:
| Exposures | cm | inches | Exposures | cm | inches | Exposures | cm | inches |
| 1 | 30 | 12 | 13 | 76 | 30 | 25 | 122 | 48 |
| 2 | 34 | 13.5 | 14 | 80 | 31.5 | 26 | 126 | 49.5 |
| 3 | 38 | 15 | 15 | 84 | 33 | 27 | 130 | 51 |
| 4 | 41 | 16.5 | 16 | 88 | 34.5 | 28 | 134 | 52.5 |
| 5 | 45 | 18 | 17 | 92 | 36 | 29 | 138 | 54 |
| 6 | 49 | 19.5 | 18 | 96 | 37.5 | 30 | 141 | 55.5 |
| 7 | 53 | 21 | 19 | 100 | 39 | 31 | 145 | 57 |
| 8 | 56 | 22.5 | 20 | 103 | 40.5 | 32 | 149 | 58.5 |
| 9 | 60 | 24 | 21 | 107 | 42 | 33 | 153 | 60 |
| 10 | 64 | 25.5 | 22 | 111 | 43.5 | 34 | 157 | 61.5 |
| 11 | 68 | 27 | 23 | 115 | 45 | 35 | 161 | 63 |
| 12 | 72 | 28.5 | 24 | 119 | 46.5 | 36 | 165 | 64.5 |
Strictly, 30cm is 11.81 inches and 12 inches is 304.8mm, while 38mm is actually 1.496 inches and 1.5 inches is 38.1mm. In reality, working to the nearest cm or half inch is more than adequate. You should never need to add more than maybe one centimetre or half an inch to the figures given above — but for obvious reasons, it is better to err on the side of extra length, rather than less, and given that measuring film in the dark is not especially easy, many people add on an inch or two (3-5cm) to be on the safe side.
It is worth remembering that 35mm film almost certainly derives from slitting 2¾ inch Kodak film in half to make movies in the late 19th century, so it’s really 1 3/8 inch film, not 35mm. The perforations seem also to be calculated on an inch basis, which is why the standard length always goes up by 1.5 inches but occasionally ‘skips’ on the centimetre count: the increment is normally 4cm (e.g. 88-92-96-100) but every now and then it drops to 3cm (e.g. 100-103) to get back in synch with the inches.
A very crude, but quick and easy, approach is to load the film until it is very slightly smaller in diameter than the centre spool of the cassette, and take this as 36 exposures. It may be 37 or 38 but you won’t have a problem until you get to roll 18 with a 30m roll, when it may (or may not) be a bit short.
the savings
Typically, if you are loading from bulk, a 36-exposure load from 30 metre bulk will cost 30-40 per cent less than buying in cassettes; at best, you may save 50 per cent.
If you want only half a dozen frames, you can load that, too, without having to waste an entire 20-, 24- or 36-exposure film. Of course loading 36-exposure films gives you the lowest cost per frame, if you use every frame, because less is wasted on leaders and trailers.
Against these savings you have to amortize the cassettes and any loading equipment you may buy. Some cassettes may be re-used effectively forever — see the free page on reloadable cassettes — but the velvet-lip variety are generally reckoned to be good for anything from 6 to 20 reloads before they need replacing. Bought in bulk (100 at a time) they are however very cheap: well under 10 cents/8 centimes a cassette, maybe a shilling each (5p).
Before you decide to load your film from bulk, take a hard look at how much film you are likely to shoot, and how much you will have to spend on cassettes and any other supplies. If you reckon you are likely to save less than $100/80 euros/fifty quid a year, ask yourself if it is really worth it, given the disadvantages listed below.
the disadvantages
Rolling your own is time-consuming and if you use velvet-lip cassettes the risks of scratching and light leaks are greater than with factory-loaded cassettes. There is also the point that if you do not anchor the film adequately on the spool, it may pull off when you are shooting, which very rarely happens with commercial cassettes.
|
|
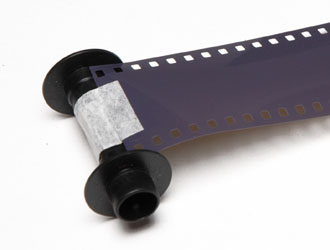
Fixing the film to the centre spool This is obviously important as you don’t want the film pulling off the spool! With tape, you need a long enough piece of tape to tape BOTH sides, but it must not be so long that it protrudes from the velvet lips after the last frame. An ideal length is 1¾ inches or 45mm. On the right is a Leica centre spool with what the Shirley-Wellard instructions so charmingly call a ‘rat-trap’ to secure the film. The taper on the film does not need to be long: two perforations’ length is adequate, as here, and more than 3 is too much. | |
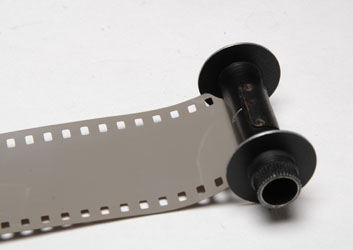
The more you re-use the same cassettes, the greater are the risks of both scratching and light leaks. This is why we almost invariably use old, expensive labyrinthine reloadable cassettes such as the ones from Leica or Shirley Wellard. These have the further advantage that the film is usually anchored in the centre spool by some form of grip-slot rather than by tape, though cutting the film end to engage in this can be unreasonably difficult. We use an old Leica ABLON cutting template.
If you want DX coding, you have to buy stickers for the appropriate ISO value, but most people who bulk-load seem to prefer to set their meters manually, or they use non-metered cameras.
how to load
There are many approaches from the extremely casual to the highly scientific.
The most casual approach is to tape one end of the bulk film to the spool (or stick it in the slot); stretch out your arms to ‘measure’ the length roughly; wind the film onto the spool; cut off the end; and declare it done. Depending on the length of your arms, your dexterity, etc., this can be surprisingly consistent.
Equally casual is to fill the spool until the diameter of the wound-on film is a little less than the diameter of the flanges at the end of the film spool. Once again this should be pretty good, though from 30 metres you may get 17 exposures of 38 frames each and one of 30 to 35.
The next step up is to measure the film more carefully, usually between two pins; cut off the amount required; and spool that. Consider the possibility of mounting the pins (small nails) vertically. Use the upper nail to secure the loose end of the roll, two perforations from the end (if you tear through the first, it won’t matter in that case) and use the lower pin to measure the length of the film. Cut, and load from the lower hanging end, with the upper end supported, so the film doesn’t fall on the floor while you are loading.
After this, you need either a bulk film loader or a film winding crank.
bulk film loaders
These are loaded in the darkroom and can then be used to load cassettes in daylight. They usually have an inner shell and an outer shell. When the cassette is placed in the loader the bulk chamber is sealed; when the cassette is in place and the light-tight lid is closed, the two shells are rotated relative to one another and aligned so that there is a clear, unobstructed passage between the bulk roll and the cassette.
There are many patterns, old and new, and they vary widely in sophistication. Some work by counting clicks (one click per 24x36mm frame, plus 7 clicks for the leader and trailer); some have mechanical film counters; some work by counting turns (see below, about film winding cranks); some even have automatic opening and closing provisions for some kinds of labyrinthine film cassette. All that we have encountered are fitted with interlocks so that you cannot easily open the cassette chamber if the bulk film chamber is open and would allow light to strike the bulk film.
We have tried several over the years, and find the simplest ones are often the easiest to use and most reliable. But then, we prefer to use a film winding crank anyway (see below).
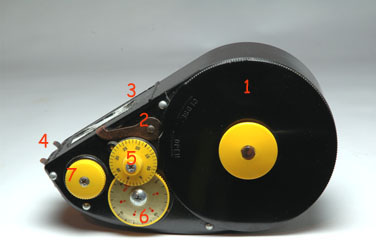
One minor disadvantage of bulk loaders is that the last few frames of each film are necessarily fogged because they are exposed to the light. This should only matter if you try to shoot frame 37 (or more) on a 36-exposure film. Alden bulk film loader These are no longer available new but show the typical features of bulk film loaders. The bulk film is in the chamber 1; the interlock 2 ensures that this is light-tight whenever the cassette chamber door 3 is opened. The cassette chamber door is retained by two springs 4. The frames are counted on the dial 5 and dial 6 tells you how much film you have left. The remaining knob 7 is for closing labyrinthine cassettes (not very successfully — it is easier to turn off the lights and do this manually). The actual winding crank is on the other side of the loader, opposite 7. |
|
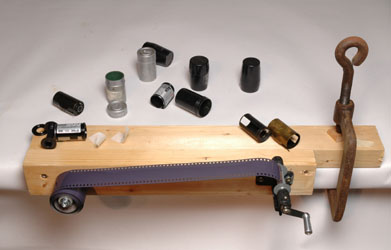
| bulk film loading cranksThese useful little tools appear reasonably often at photo fairs or can be made up by the mechanically inclined (Meccano is ideal). We do not know of any source of new ones. They are used for bulk loading of 35mm in a completely dark room — and it had better be pitch dark because the film is out in the open for the whole time you are loading it. Bulk film loading crank (with Leitz spool) We have had this for so long we forget where it came from. |
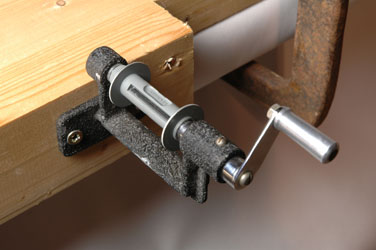
In one of our darkrooms, long ago, the loading crank was permanently mounted on the bench. Now we use a piece of wood with the crank and the nail (for holding the bulk 35mm film) fixed to it, and G-clamp the whole assembly to the bench if we want to use it. Bulk loading crank clamped to studio table This is not in the darktoom because it was a lot easier to move the film crank than to move the lights, camera, etc. Note the two pieces of pre-cut tape on the wood. These should be a maximum of about 1¾ inches (45mm) long so that they don’t poke out of the velvet lips when the film is fully extended at the last frame. Obviously the extra thickness of the tape can damage the velvet and reduce the efficacy of the light sealing. |
|
There are two ways to use them. One is to cut the film to length, as described above; hold the rolled-up film in your left hand; and wind with your right. The other is by counting turns with bulk film, as in the picture. Film measuring is pretty approximate, to the nearest frame, and it’s always tempting to give an extra turn for luck. Also, a certain amount depends on how you fasten the film to the spool (centre slot or tape) and how tightly you wind the film. With an ex-Ilford centre spool, cutting the film at the small index nail (barely visible here, as a black dot about a hand-span left of the winder), the number of exposures corresponding to each complete 360 degree turn was as given below. Thirty-three turns filled the spool completely at 180cm or approximately 40 frames.
| Turns | Turns | Turns | Turns | Turns | Turns | Turns | |||||||
| 1 to 5 | 0 | 9 | 5 | 13 | 10 | 17 | 15 | 21 | 20 | 25 | 27 | 29 | 33 |
| 6 | 1 | 10 | 6 | 14 | 11 | 18 | 16 | 22 | 22 | 26 | 28 | 30 | 34 |
| 7 | 3 | 11 | 8 | 15 | 12 | 19 | 17 | 23 | 24 | 27 | 30 | 31 | 36 |
| 8 | 4 | 12 | 9 | 16 | 14 | 20 | 19 | 24 | 25 | 28 | 31 | 32 | 38 |